
Neon X360 Manual
Controller 2: Feedback
(Note that not *all* effects follow the canonical allocation of 1: Camera, 2: Feedback, 3:Boingy/Psychedelia and 4: Tunnel but many do - we'll find examples that illustrate each controllers' function).
The first thing we need to do is get an understanding of what feedback actually *is*. It's actually one of the most powerful things for changing the overall look of an effect and the best way to understand it is to have a bit of a play with it.
Set up your xbox with two controllers, then use controller 1 to navigate to this effect:
Then pick up controller 2 and let's explore the basics of Feedback.
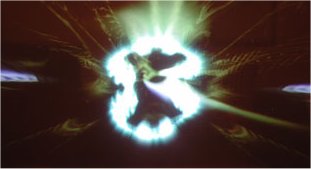
The basic technique of Feedback is something that I've been using since the old JagVLM and Tempest 2000 days, and the way it works is that instead of clearing the screen each frame to draw the scene, what you do instead is draw the *previous frame* instead. Normally you do this with some modification - for example you might scale the previous frame up a bit, and draw it at a lesser intensity than it was originally. If you do that then what you see is that objects in the scene appear to emit a kind of "smoke" or "glow" that radiates out from the centre of the screen. (Things can be a bit more complex in Neon because the feedback can apply only to certain *layers* (which we call "stacks") of the effect, and the feedback can be filtered or nonlinear, but the principle is basically the same, and this effect is a handy one to explore it.
What the feedback controller does is allow you to control on the fly the transformations that get applied to the previous frame when it's redrawn to the scene. You can control the Intensity (the brightness when it's redrawn), the Scale (the amount by which it is stretched or shrunk, in both the X and Y directions) and the Rotation (the amount by which the previous frame is rotated around its middle when it's drawn).
Pick up controller 2 and have a play with the right analog stick whilst watching the effect. Your vertical axis on that stick controls the intensity (Up to increase, Down to decrease), and the horizontal axis controls the rotation. Play around a bit and notice that with the stick pushed fully up you're almost overloading the effect, causing it to go almost fully to white; when that happens, ease down on the stick to back off the intensity a little. Play with the rotation too and notice the swirly vortex-style effects that appear.
When you're happy that you can see what is happening there, try introducing movements of the other stick. Push the left analog stick all the way up and to the right, whilst continuing to adjust the intensity and rotation with the left stick. What you are doing there is pushing both the X and Y scale way down to their smallest values, with the result that all the feedback gets "sucked in" towards the middle of the effect. You should see that the feedback stuff gets sucked down into clearly visible quadrants of the screen, and those quadrants fill up with intricate, receding details. Hold that position on the left stick and continue to explore with the right analog stick to see what happens.
Next try opening up the X-axis scale of the feedback layer - keep the left analog stick pushed up, but lean it all the way to the left instead of the right. Notice how, when the rotation is close to zero, you'll get a long, horizon-type line with lots of horizontal striations that will tend to divide the screen - this is due to setting maximum scale horizontally whilst having minimum scale vertically. Keep playing with the intensity and rotation, then just have fun and explore around all the settings freely. If you get confused and "lose" what you're doing, push the left stick all the way up and right then ease down gently on the intensity (Y axis of right analog stick) if it's overdriving, or up gently if it's not bright enough, until you see the complex structures emerge. Then rotate the feedback gently until you get squared up. Just like the camera, if you let go of the controller, the automatic controls will take over and straighten things up for you anyway.
Those are the basic controls of Feedback, but it isn't just those which make the effect so powerful .
In the mode with which you've been playing, when we do the feedback, all we've been doing is simply copying the previous screen with some geometrical changes applied (plus intensity, of course). But there are many different ways we can copy the previous screen apart from just a straight copy and intensity change. In fact *anything* that gets drawn in Neon can be drawn through a variety of what are called "pixel shaders", which can affect what is drawn in many different ways. They can introduce distortion, or change the colours, or blend with or filter through another image, or do a variety of things. Some of them don't do that much when used in feedback but others can make a big difference to what you see.
You can use the d-pad on controller 2 to change the shader usage on the fly. Press the d-pad right to step one shader "up", or press it left to step one shader "down". There are 26 different shader settings in there. Step through them and explore them in the same way as you did with the straight copy shader we started with, and observe the different kinds of thing that can happen.
When you're happy with changing shader and exploring the resultant effect, try using the d-pad on controller 1 to explore all of the effects in the matrix, then play with the feedback settings in each effect using controller 2. (You may find that some effects don't use feedback, in which case the controller will do something else, or that the feedback isn't in the primary layer - we'll explain more about layers when we cover the next controller - but most effects should have some feedback in them). The easiest way to see what the feedback controller is doing is to begin with the right analog stick pushed all the way up (maximising the intensity of the feedback effect) and switch between the shaders using the d-pad. Once you have a handle on "where it is" you can begin to explore and play.
Some tips for controller 2
- Explore gentle intensity changes. In some of the feedback effects, the most "interesting" zone to explore is right where the the intensity tips over the threshold between normal and "overdriven". You'll know that zone when you find it - try just delicately adjusting the feedback right around that zone, and play with the other parameters as you do so. The results can be very interesting.
- Explore scale-down and uneven-scale feedback. When the scale of both axes is small, or one is small and the other not, you tend to get the most interesting and intricate detaisl in the feedback, with all kinds of fractal-looking structures emerging from the feedback.
- Do explore the shaders. Certain shaders and settings can yield a much more "chaotic" style of effect than is the norm for Neon's default effects which can be quite interesting.
- If you explore enough around, you may discover the signature logo of a beast... }:-)
More >>>