Space Giraffe
Space Giraffe Gameplay Elements
Here you can learn about essential gameplay elements of Space Giraffe.
“Tempest is a “shoot the bad guys before they get you” game, but Space Giraffe is a “manage chaos and cultivate beneficial situations” game. They feel totally different."
Jonathan Blow(developer of Braid)
“Play it until the scoring system clicks and it’ll have you forever.”
Xbox World 360 Magazine UK
Space Giraffe is an abstract (mainly) shooting game played on a geometrically shaped surface floating in space.
The player controls the Space Giraffe, which is free to move along the near edge of the surface. The player guides the Space Giraffe using the left analog stick. Powerups (Jump Pods) are available which allow the Space Giraffe to jump above the edge of the surface. Enemies attack from the far edge of the surface and attack the Space Giraffe in a variety of different ways. For more information about the enemies, see here.
The Bull Gauge
This is for the enhanced PC version only.
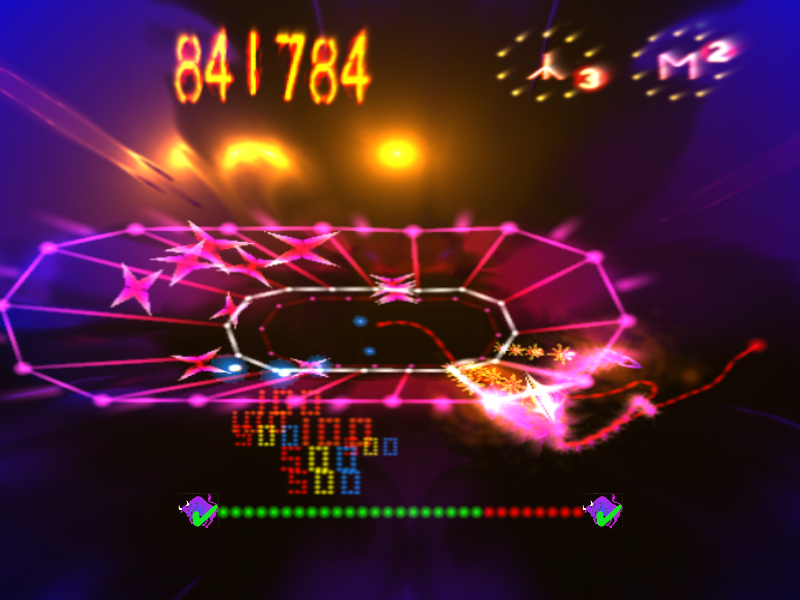
The gauge(the two bulls and red/green dots) is a little help displayed only in the tutorial and the first 15 levels. You can enable/disable by pressing F1.
It corresponds with the Power Zone, one of the core Space Giraffe gameplay elements, showing how much the Power Zone is extended and whether you can bull or not. So it helps you to learn how the Power Zone and Bulling works. More explanations about the Power Zone and Bulling follow:
The Power Zone
Let’s learn about the Power Zone and bulling, the core gameplay elements of Space Giraffe.
Think of the whole surface as being one big Power Zone meter. Shooting or otherwise destroying enemies and/or using a Jump Pod fill up the Power Zone. The Power Zone is depicted as glowing lines on the game surface. As the Power Zone is filled up, glowing lines extend from the near edge of the surface, dividing it up into channels. A fully extended Power Zone makes the surface look like the web from the old Tempest game. If the Power Zone is empty then you don’t see the “lanes” on the surface.
The Power Zone extends for using a Jump Pod and/or for shooting and killing enemies. It retracts over time if you do not keep doing any of those things. If you stay still in one position on the near surface the Power Zone retracts more quickly, so it is advisable to keep moving if possible.
While the Power Zone is extended, the following benefits occur:
|
Bulling
This is the main scoring attack in Space Giraffe. In general, the shooting attack is used for level management and defence, whereas the Bulling attack is used to build up score.
If the Power Zone is active to any degree, then Bulling can take place. To Bull an eligible enemy, simply cause it to collide with the giraffe in any way you can. If you bull off many enemies in quick succession you will increment the Bonus Multiplier. The Bonus Multiplier is applied to every score throughout the level so in order to score well it is imperative that you increase it early and hold it as high as possible for as long as possible, preferably leaving the level with it maxed out at x9.
Thus, playing a Space Giraffe level effectively means learning how, in any given level, to accumulate as many bullable enemies as possible on the near edge, and then bulling them off all at once to raise the Bonus Multiplier as much as possible. Once the Bonus Multiplier is at x9, further bulling increments and awards an accumulating amount of bonus points.

Bonus Multiplier is displayed at the right top of the screen with the “M” mark, next to the remaining lives. In the case of the picture above, remaining lives are 3, and the Bonus Mulitplier is x1.
Ideally in a level you will bull up to x9 as soon as you can, then ensure that you play defensively enough to keep the BM there until the level ends, taking extra opportunities for further bulling should they present themselves so as to capitalise on the incremental bonus being awarded at x9.
Powerups (“Jump Pods”)
These are released periodically as enemies are destroyed. You can hear a distinctive sound when they are released. They travel up the surface towards the player and can be collected. If not collected they will eventually float away “above” the player and be lost.
Collecting Jump Pods provides the following benefits:
|
Collecting a Jump Pod at the end of a level, while the giraffe is moving down the surface on the way to the next level, is a special case: if this occurs the “Yes! Yes!” sound effect is heard, and the player will have Fast Bullets from the beginning of the next level.
Smart Bomb
The player has one use of the Smart Bomb per giraffe (triggered by pressing A). Using the Smart Bomb will unleash 16 sequential laser shots on enemies near the player. This usually kills them outright but may not in the case of Flowers/Boffins. Once the Smart Bomb is used, the giraffe’s tail disappears.
Enemy shot juggling
All enemy shots(note: flower heads not included!) can be shot in turn by the player’s shots. Shooting an enemy shot pushes it away from the player, towards the far edge of the surface. It is possible (and desirable) to shoot enemy shots away so that they actually leave the surface entirely and float out into the space beyond the surface.
When a level ends all enemy shots still active become harmless to the player, and as the player passes each one it explodes with a “sneeze” sound effect and a bonus is awarded to the player. The bonus awarded depends on how long that enemy shot has been “alive”.
Enemy shots pushed off the surface and out into free space will, over time, turn around and drift back towards the surface, eventually re-entering the surface from the far edge, sometimes at considerably more speed than they were originally fired. The player should keep an eye out for such returning shots (their re-entry to the surface is signaled by a ‘dog bark’ audio cue). These can be avoided or, better still, shot away again. The more times a shot is “juggled” in this way, the more points will be awarded when the level ends and the remaining active shots are converted into sneeze bonuses.
You can practice this in the third part of the tutorial.
End of Level Bonuses
These are awarded upon completion of each level, and depend upon efficiency of collecting powerups, usage of Jump Pods, number of lives in hand, skill at early shooting of enemies, and of course the Bonus Multiplier.
Bonus Round
The player gains access to the Bonus Round by collecting OX Warp Tokens as detailed in the Jump Pod description above. When sufficient OX Warp Tokens have been collected, at the end of the current level, the player will be taken to the Bonus Round.
In the Bonus Round no lives can be lost; the player has simply to collect Flowers with the giraffe’s hooves for as long as he can. There are four Trails that generate Flowers. Missing Flowers on any Trail causes it to weaken and eventually die out. Eating Flowers causes the giraffe to burp. A bonus is given for each Flower eaten according to the total number of flowers eaten, the number of active trails, the number of lives that the player has in hand, the value of the Bonus Multiplier, and the number of times the giraffe has burped.
Once all four trails have died out the player is returned to the next round of normal gameplay.
Game Progression and Restart Bonuses
The player begins a new game with levels 1-9 unlocked. Play may begin on any unlocked level. Reaching a level beyond the highest currently unlocked level makes that level unlocked and available as a starting level. There are 100 levels in the game; completing level 100 finishes the game(and unlocks the Super Ox Mode).
Each level has an associated Start Bonus. This is initially zero for all unlocked levels. If a player arrives on a level with 3 or more lives intact, and his score at that time is greater than that level’s Start Bonus, then that level’s Start Bonus is set to the score.
With Start Bonus, a player can restart levels with saved high-score. When a player begins a game on any level, once he completes the level he started on, then that level’s Start Bonus is awarded and play continues. The Start Bonus is awarded only once per game, upon completion of the chosen starting level.
Thus as players become more experienced they can play to increase each level’s Start Bonus; the effect of this will tend to ripple up through subsequent levels. Players who wish to have a shorter game by starting on a higher level will not therefore have to give up the possibility of getting a high score.
Start Bonuses are saved to the player’s profile when his game is over.
Score Graph
The Game Over screen shows the score graph. You can check your performance against your own best scores per level and against what the game “thinks” is a good score. Also you can choose to restart from any level you want(to improve your scores, possibly).
The orange blobby bit of the graph represents the game you’ve just played. The green bit of the graph is your own best level scores (which are used as start bonuses, as previously explained). The middle yellowish trace is what the game considers to be a “good” score.
The graph is live – you can use the sticks to zoom it and move the cursor. You can move the cursor down to see how you were at a certain level, and the stats are displayed. Also if you press A, you can restart from the selected level.
Super Ox Mode
After completing level 100, you can access to Super Ox Mode. In “Choose Mode” screen, try what the game complete page has told you. You have to press the Y button plus another. (Note: The command won’t work until you actually finish level 100)
|
The combination of all the stored level hi-scores generate your Super Ox levels. So your Super Ox level names (and the order of the actual levels) will appear consistent, until you set a new Start Bonus on any level, whereupon everything gets re-seeded and all the names and level order changes, generating a new Super Ox configuration.
Play it for challenges, play it for hi-scores, or play it just for a random laugh. Enjoy!
Inside >>>